What's That?
What is blocking?
It's a method that involves soaking your knitting in water and then letting it dry. But you might ask, why call it blocking and not just washing?
The reason is that, in fact, we let the project dry flat, making sure that all parts are in the correct dimensions. To achieve this, we secure them with pins, combs, or a specific support to ensure they don't move.
The Point
If this method is widely used by knitters, it's because it offers several advantages:
- As the name suggests, it primarily serves to block the work. This prevents it from stretching over time and losing its shape, especially with soft fibers like alpaca.
- It also allows for rectifying errors, providing more consistency to the work, ensuring a straight drape of the stitches.
- Additionally, it helps eliminate spinning grease or any potential unpleasant odors.
- It also aids in breaking the stiffness of fibers and adding flexibility to the material and might help gaining a few centimeters in length or width. .
However, there are also some less positive aspects:
- This step is often overlooked or considered tedious because it requires time, and one must wait for the complete drying before being able to wear the finished project.
- It's a meticulous task, especially in checking the dimensions, and if not done carefully, the work may come out deformed.
- In the case of soft materials or oversized designs, blocking tends to cause some stretching. If you've knitted too loosely, there's a risk of an overly saggy appearance. It's advisable to knit smaller in such cases to anticipate this stretching.
While blocking is not mandatory, it's essential to keep in mind that without it, your work may tend to shift or change shape over time.
Hat, Beanie or Headband Blocking
Blocking head accessories is rather a classic method compared to other knitting patterns, with one key difference...
These pieces are meant to be worn "in 3D," so to speak. Since the head is a sort of hemisphere, it's interesting for the blocking of a beanie or headband to mimic this shape for the best fit.
Of course, it's not essential, and it's entirely possible to use the commonly used blocking method for sweaters, for example: pin or comb blocking.
However, it can also be interesting to work with a 3D blocking method, using a form of the right size such as a bowl or a flower pot, on which the beanie or headband can be placed. The advantage of this method is that your accessory will be blocked without pronounced creases on the sides, which could be unsightly when worn. It will also have the advantage of forming a beautiful rounded shape well adapted to the curvature of your head.
Personally, this is the method I prefer and use the most after several failures with the traditional method, which left my beanies with very pronounced edges, giving me an ice cream cone-like head...
The Method
For your information, if you're looking for something more visual, the instructions below are also available in a YouTube video on my channel here: https://youtu.be/LlIpRrTtnxM
But if you prefer written instructions, here are the detailed steps for blocking a hat, beanie or headband:
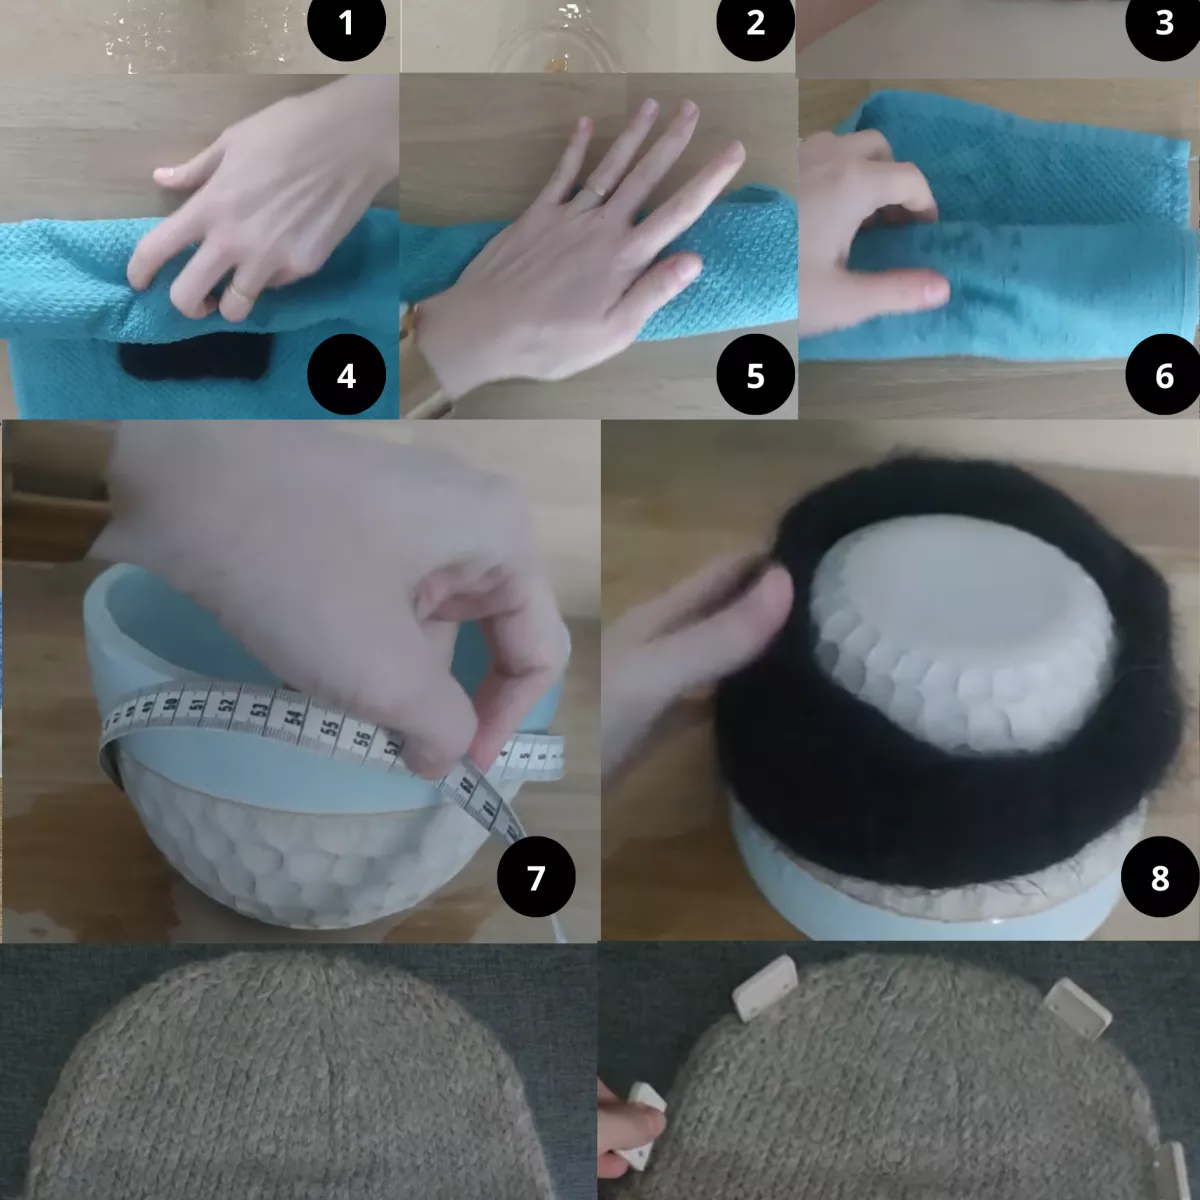
- Prepare a warm water bath in a sink, basin, or large enough container to accommodate your work.
- Add a bit of special wool detergent. It's not mandatory; what matters is the water, but it can help remove some odors. Add your beanie or headband and let it soak for a maximum of 15 minutes. Some recommend between 15 and 30 minutes of soaking, but personally, I only work with natural fibers, which are more fragile, so I prefer to avoid soaking them to prevent damage. The essential thing is that your work is fully immersed in the water.
- Drain the water and press beanie or headband to remove excess water with the flat of your hand. Do not twist as it breaks the fibers! Also, do not rub as it damages the fibers.
- Lay your beanie or headband flat on a towel or absorbent fabric and roll it up like a burrito!
- Press firmly to remove excess water. You can also walk on it, but still, do not twist.
- Unroll the towel.
- and 8. Two options here:
- Option 1: Find a bowl or pot corresponding to the desired head circumference and place the beanie or headband on top.
- Option 2: Position the beanie or headband on a flat surface like a chair or a yoga mat. Place blocking combs or pins.Make sure the dimensions match your measurements or the pattern standards for this option. Adjust the placement of combs/needles if necessary.
9. Wait for everything to dry, and you're done!
And there you have it, a lovely beanie or headband blocked and ready to accompany you on all your cold adventures!
Don't forget to tag me on Instagram, Facebook, or TikTok with the hashtags #terrifiknits and #beanieblocking or #headbandblocking or #hatblocking once you're finished! I can't wait to see the beauties you'll block with this tutorial!
What You'll Need:
- Warm water
- A bit of wool detergent (optional)
- Blocking combs or pins
- Flat surface like a mattress, sofa, or yoga mat


There is no comment yet.
Add a comment